
“Sigmaprobe is the best vehicle smart tester which is easily available now“, shared by an automobile maintenance engineer who has been engaged in automobile maintenance 12 years from Pilsen, Czech Republic, let’s listen to his experience for Sigmaprobe after we sent one pcs sample to him.
1.“My few comments on Sigmaprobe hardware design ”
Firstly, When I received Sigmaprobe, my first feeling was that its tool box was very good, which solved the storage problem of so many spare parts. This is very important for careless me, otherwise I may need to buy spare parts many times.
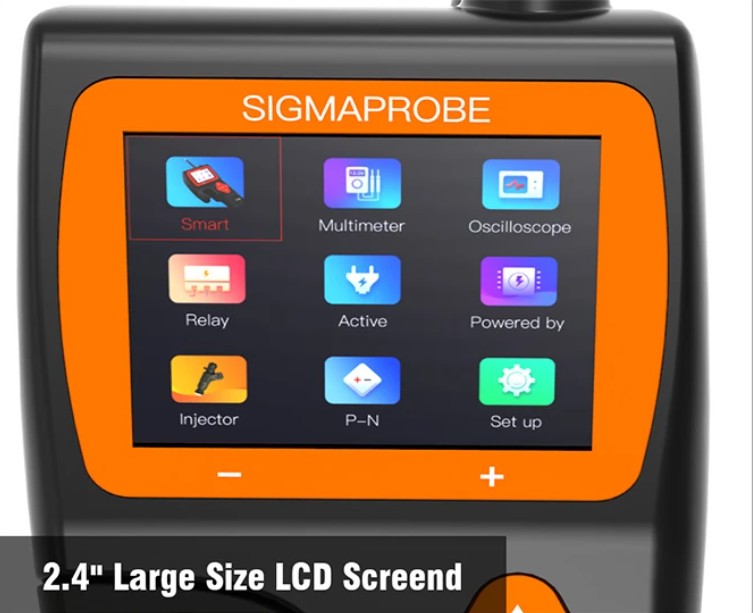
Secondly, what impressed me most is that I’m sure that it’s the biggest screen of the circuit tester on the market. The large color display screen is very clear for me to view the test data. It’s much better than the black and white one I used before. Also, its long cables can be tested over the entire length of the vehicle without constantly searching for a suitable vehicle ground point.
I look at the related products on the market on the Internet. Basically, the functions are relatively single.
For example, in the maintenance of a car with circuit fault, we need to buy a set of circuit tester, an oscilloscope, a relay tester and a power supply device that can output 0-5V. If you also need the function of component activation, you need to buy another set of tools for component activation.
First of all, it brings you a lot of investment in tools, and it is more complex (cumbersome) in actual use. Every function you need to use needs to replace a set of equipment, which is very bad for work efficiency and working state.

If the tool I have is sigmaprobe, these problems will be very simple.
Sigmaprobe has eight functions of automotive circuit test: smart test, multimeter mode, oscilloscope mode, relay test, injector test, positive / negative test, component activation, 0-5V power supply mode. Functionally, it is a very powerful and comprehensive circuit testing tool. The most important thing is that it can really improve our efficiency in vehicle maintenance. First of all, we don’t need to use so many tools, and then it is more convenient in the actual operation of function realization. One screen and five buttons can get the results I need. What surprised me most was that the accuracy of its test results was very high.

Then I’ll talk about the functions and cases of Sigmaprobe that I used in actual testing.
1: Positive and negative polarity reverse protection:
After I got the Sigmaprobe, I couldn’t wait to find a car to test it. First of all, I specially reversed the positive and negative poles of the alligator clip to verify whether it has wrong connection protection. As a result, the Sigmaprobe is supported. When I wrongly clamped the positive and negative poles, the Sigmaprobe host did not enter the power on state.
2: Overloaded protection:
Sigmaprob is consistent with what it advertises and has dual overload protection. First of all, the internal overload protection system of the host will automatically cut off. Then the 25amp fuse protection tube in the auxiliary grounding wire is used for power-off protection.
3: Continuity test
When the sigmaprobe is in the resistance mode of the multimeter, it can continuously test the lines or components of the automobile circuit system by contacting the probe with the chassis or the grounding auxiliary line. When the probe is well grounded, the LCD screen will display 0.0, and the green LED indicator will also light up. Then the buzzer makes a short sound.
In other cases, the LCD will only display the resistance value
If the resistance is greater than 200 kΩ, the LCD displays OL There is another way to prove grounding or battery continuity. Use the power switch to connect the power supply. If the circuit breaker trips, it indicates that the connection is a good low resistance connection.
4. Circuit signal test
When I found that ECU has a fault code, it may be caused by M.A.P. sensor. Using Sigmaprobe, there is a quick way to test and verify the fault code. (it’s convenient to test the sensor with Sigmaprobe)
Enter the oscilloscope function of the device, and use the probe to contact the chassis or grounding auxiliary wire.
Connect the vacuum pump to the M.A.P. sensor
Contact the probe with the positive pole of the M.A.P. sensor, and then observe the LCD. Under normally, the display should be sinusoidal Start the vacuum pump Release the vacuum pump and observe the LCD reading *If the LCD display waveform is abnormal, then the sensor has some errors. The above are some introductions and knowledge about Sigmaprobe that I sorted out today, and the other two are the functions I used. I am very positive about Sigmaprobe. In the next few days, I will continue to explore its functions, use more, and will share with you again.
Enjoys!
Related Articles:
1.Sigmaprobe the most worth buying repair tool in 2021
2.Sigmaprobe guard circuit testing saftey
VXDAS, focus on OBD tools since 2008!
Join groups to get more free resource!
Group: https://www.facebook.com/groups/vxdas/
Website: www.vxdas.com
Whatsapp:+ 8615361020853
Skype: obd2motor
Email: sales007@vxdas.com


Leave A Comment