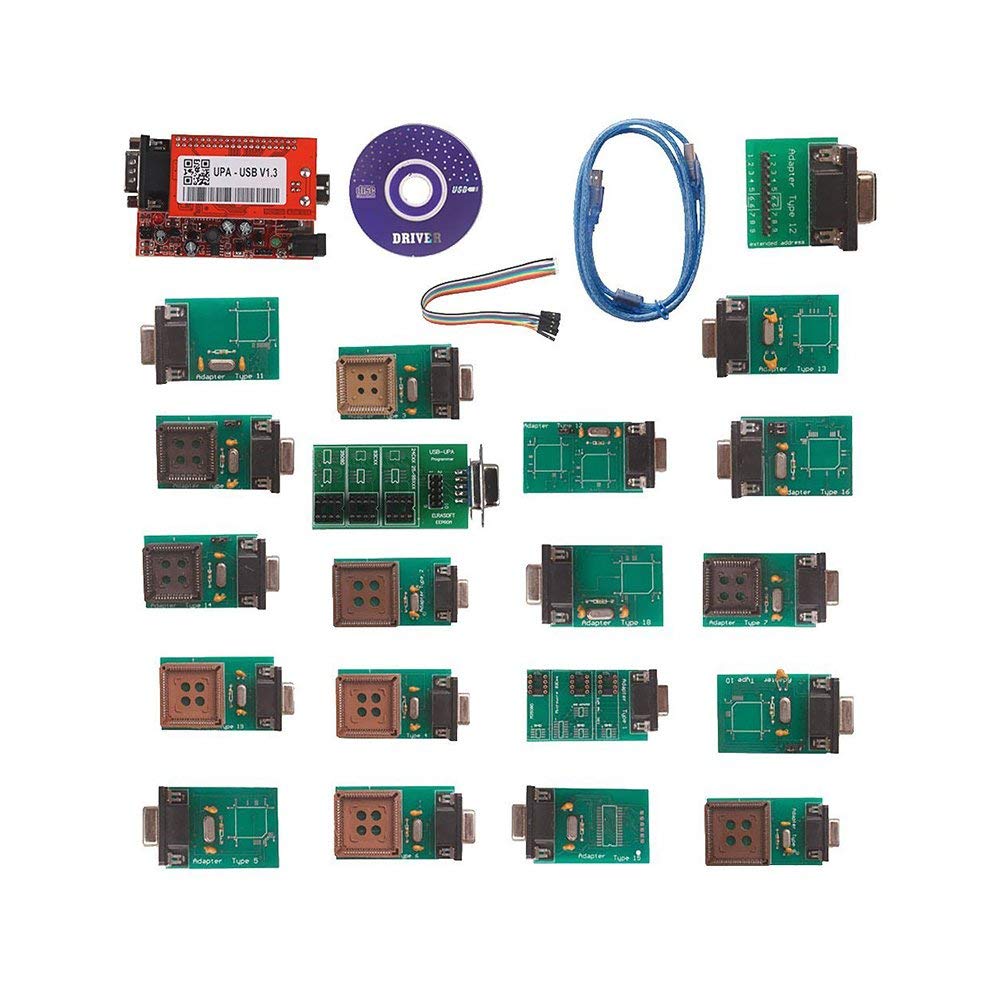
VXDAS UPA USB Programmer full set with all adapters support Multi-Type Eeproms&Microchip .The main Device can be directly connected to the Elrasoft.com UUSP (UPA-USB Serial Programmer) or by an optional DB9 male / female 1:1 extension cable.Device configuration is done over special config keys which make the work convenient and safe compared to wiring up all manually.
Top 4 Reasons To Get UPA USB Programmer
1. Language: English.
2. Hardware Version: V2014
3. Software Vesion: V1.3
4. Support Nec Function, but Has No NEC Adapter in the Package
UPA USB Programmer V1.3 Update Information:
Added MC9S12HY64/HA32 support
Added Serial Flash memory support: A25L512/010/020/040/080/016/032, SST25VF512A/010A/020B/040B/080B/016B/032B, S25FL004A/008A/016A/032A/064A
Added 24C1024, 24C1025 support
Added Bulk erase data memory to PICs 16F913-7/946, 12F629/675
Added script function GetPage
Added script function AutoBaudRateDevice (hc08 devices only)
Added script function GetProgrammerFrameChildCtrl( AChildCtrlName: string): TControl
Added script function EnablePicMemoryAreas ( AProgram, AID, AConfig, ACalibration, AEEPROM: boolean ): boolean;
Fixed bug with script functions ProgramDevice, ReadDevice … when used with PICs
Fixed bug with SetHC08SecurityBytes (SecBytes: string) function
Fixed bug with 68hc11 reading if Oscillator is not set to Auto
Updated script example files
The software is digitally signed
USB driver upausb.sys is digitally signed
EEproms
Simply connect the mainboard to the UPA programmer directly or by using a DB9 male / female extension cable (1:1). Insert the correct config key into the slot of the mainboard and start programming either via the ZIF or SOIC Socket. You can also use the included DIL to 10pin Flat-ribbon header, put it inside the ZIF socket and wire up an SOIC clip or clamps for ISP use from there.
Motorola MCU’s
Pick the Adapter you want to use, attach the flat cable to the Adapter (PIN1 is always indicated, on both the cable and also the Adapter) and also to the main board’s 10pin ISP connector. Select the VCC supply source by the jumper on the mainboard next to the ISP connector (on = target supplied from upa, off = target got own supply). Slide the Adapter over the soldered PLCC MCU on the target PCB. (No soldering, no pinout reviewing, no pin counting, saves lots of time and hassle and let’s you make your job faster, precise and easier)
Once your workshop is equipped with our Adapter Set you will have a all new UPA Experience.
STMicroelectronics ST62*:
ST6240, ST6245, ST6249
NSC CR16*: CR16HCS5(9), CR16MCS5(9), CR16MES5(9), CR16MFS5(9), CR16MCT5/9, CR16HCT5/9
Motorola HC05*: MC68HC05B6, MC68HC05B8, MC68HC05B16, MC68HC705B16, MC68HC05B32, MC68HC05E6, MC68HC705E6, MC68HC05H12, MC68HC05L28, MC68HC05P3, MC68HC705P3*, MC68HC05X16, MC68HC05X32
Motorola HC08*: MC68HC08AS20, MC68HC08AS32, MC68HC08AS60, MC68HC08AZ32, MC68HC(9)08AZ32A, MC68HC908AZ60, MC68HC908AZ60A
Motorola HC11*: MC68HC11A1, MC68HC11A8, MC68HC11E9, MC68HC11EA9, MC68HC11E20, MC68HC11F1, MC68HC11K4, MC68HC11KA2, MC68HC11KA4, MC68HC11KG4, MC68HC11KS2, MC68HC11KS8, MC68HC11L6, MC68HC11P2, MC68HC11PA8, MC68HC11PH8
Motorola HC12*: MC68HC912B32, MC68HC912BE32, MC68HC912D60, MC68HC912D60A, MC68HC912DC128A, MC68HC912DG128, MC68HC912DG128A
Motorola HCS12*: MC9S12D64, MC9S12A128, MC9S12DG128, MC9S12DG256, MC9S12H128, MC9S12H256
Atmel 8051 Architecture: AT89S51, AT89S52, AT89S53, AT89S8252, AT89S8253
Atmel AVR 8-Bit Risk: AT90S1200, AT90S2313, AT90S2323, AT90S2333, AT90S2343, AT90S4433, AT90S4434, AT90S8515, AT90S8535, ATmega8, ATmega16, ATmega161, ATmega162, ATmega163, ATmega323, ATmega64, ATmega103, ATmega128, ATtiny12, ATtiny15, ATtiny2313
Microchip PIC12: PIC12F508, PIC12F509, PIC12F629, PIC12F675
Microchip PIC16: PIC16F627(A), PIC16F628(A), PIC16F648A, PIC16F72, PIC16F73, PIC16F74, PIC16F76, PIC16F77, PIC16F818, PIC16F819, PIC16F83, PIC16F84(A), PIC16F870, PIC16F871, PIC16F872, PIC16F873(A), PIC16F874(A), PIC16F876(A), PIC16F877(A)
EEPROMs I2C: 24C01, 24C02, 24C04, 24C08, 24C16, 24C32, 24C64, 24C65, 24C128, 24C256, 24C512, 85C72, 85C82, 85C92, BAW574252, GRM-003, GRM-004, GRM-005, KKZ-06F, MCM2814, PCA8581, PCF8581, PCF8582, PCF8594, PCF8598, PCF85102, PCF85116, SDA2516, SDA2526, SDA2546, X24C00, X24C01
EEPROMs Microwire: 7002, 93C06, 93C14, 93C46, 93C56, 93C57, 93C66, 93C76, 93C86, 93S46, 93S56, 93S66, GRN-001, GRO-002, KKZ-01, S220, S2914, ST61907, XLS93C46
EEPROMs SPI: M35080, 25C010, 25C020, 25C040, 25C080, 25C128, 25C160, 25C256, 25C320, 25C640, M25P05, M25P10, M25P20, M25P40, M25P80, ST95010, ST95020, ST95040, ST95080, ST95160, ST95320, ST95640, ST95P02, ST95P04, ST95P08, X5043, X5045
EEPROMs Miscellaneous: CXK1011, CXK1012, CXK1013, M6M80011, M6M80021, M6M80041, SDE2506, TC89101, TC89102
*EEPROM Only
NEC ..uDP780828A uDP780948 uDP780949 uDP780973 uDP780974
TMS…TMS370CX02 TMS370CX32 TMS370CX36 TMS370CX42 TMS370CX56 TMS370CX56 TMS370CX56 78K0/HC912
TMS370CX58 TMS370CX58 78K0/HC912 TMS375C006
https://youtu.be/oQVZmBOPwsw
You may be interested in posts:
1.CGDI FC200 ECU Programmer V1.0.0 Software Download & Installation
2.Orange5 Plus V1.35 Software Free Download
3.Xprog M V6.12 Software Free Download and Full Chip List
VXDAS, focus on OBD tools since 2008!
Join groups to get more free resource!
Group: https://www.facebook.com/groups/vxdas/
Website: www.vxdas.com
Whatsapp: +8617304481179
Skype: autodiagnostickit
Email: sales007@vxdas.com


Leave A Comment